Paleo Sandwich Bread

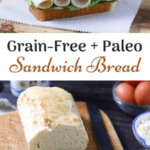
Grain-free, Paleo, Dairy-Free, Gluten-Free Paleo Sandwich Bread!
How I have missed proper sandwiches! Sometimes nothing else will do, especially on a road trip or you when need a quick lunch to pack for work or school.

And I have to tell you just how beautifully this paleo bread toasts! Slightly airy, yet substantial, with loads of nooks and crannies that are just waiting for that pat of butter to melt right into them.

And the flavor is right, friends. No curious aftertaste. What we are working on though is creating a bit more flexibility. This beautiful bread definitely has give, but not quite as much as we’d like. But this version was so tasty that we just couldn’t wait to get it to you!!

Tips For Today:
-I highly recommend this 1 pound bread pan, you’ll get a taller loaf which is better for sandwich making.
-Let your bread cool COMPLETELY inside the pan before removing and slicing.
-If you do a quick Google search, you’ll find a few really great paleo cheese recipes.
-Toast your bread before making your sandwich, even more delicious this way.
-This bread works great for french toast and grilled cheese or make toast points and add your favorite dip or a layer of smoked salmon and capers!
-This recipe works beautifully for sandwich rolls as well! I recommend using this pan with 6 wells for the rolls. You’ll want to grease the pan liberally and fill each well about 2/3 full. Bake for 25 minutes at 350 degrees. Remove from oven and let stand for 10 minutes, then run a knife around each roll to release it and flip the pan over onto a cooling rack. Let rolls cool completely, slice and store in an airtight container. We make 2 batches and freeze one and refrigerate the other.
If you love this recipe, you might also enjoy our Paleo Blackberry Cobbler Muffins!

Enjoy The Recipe + Happy Baking!😊
Print
Paleo Sandwich Bread
- Total Time: about an hour
- Yield: 12-14 slices 1x
Ingredients
Instructions
- Prep Time: 15 min
- Cook Time: 50 min


What a wonderful looking sandwich loaf! Seriously, absolute perfection! I bet it is fabulous toasted too 🙂 Great recipe, great ingredients, great lunch ahead. Oh, and I love the loaf pan you mentioned. I have the same one and it bakes things perfectly!
Oh thank you so much Noelle!! You are so very kind! 😀 And isn’t that pan just the best!?!
Thank you for your comment, I’m so sorry you didn’t get a fluffy loaf! I have a few recommendations that might help. Make sure the oven is fully preheated before baking and that the egg whites are gently folded into the bread batter and not over mixed. Adding an additional 1/4 tsp of baking soda and an additional tsp of apple cider vinegar to the batter can help as well. And finally, making sandwich rolls with the recipe also works beautifully, I just added the instructions in the tips section in the post above with the link to that pan. Hope this helps! 🙂
Thanks for your comment, I’m so sorry it didn’t cook all the way through for you!! 🙁 We always get the same results here but I have experienced different baking times using different ovens with certain recipes. I would extend the time to 50-55 minutes. I will add that as an option in the recipe now, let me know if you have any further issues, we will test this in a different kitchen this week to ensure a more universally friendly baking time.
Will this work in a bread maker?
Hello! Thanks for your comment, I’m afraid this is a quick bread recipe and would not work in a bread maker.
Is there a substitute for the egg whites by chance?
Hi! I wish I had another option for you but I’m afraid there are no substitutions at present for the egg whites in this recipe.
Try this today and think it tastes really good. Probably the best gluten-free bread I have had. I do think it tasted a little bit better with a touch of salt. I do have a question though. Mine did not rise the way yours has, why would that be? Did I press it into the pan too much maybe? Also mine was very thick, is it supposed to be thick? It was more of a Play-Doh consistency. If you’ve mentioned this in the article, I apologize.
Hello, thank you so much for your comment, we’re delighted you’re enjoying the bread! And I appreciate you sharing your experience, it always helps us to create a version that can be the most universally pleasing– I find that variations in ovens, altitudes, etc, can change the results slightly. I’ve gone in and changed the baking soda measurement to 1 full teaspoon instead of 3/4, this will add to the sodium content and rising effect. As for the consistency, this should definitely feel like a batter, not a dough. Sometimes the batter can thicken quickly due the tapioca, so we’ve also gone in and changed the instructions so that the liquid ingredients are added at the last minute and poured immediately into the pan. This should eliminate any issue going forward in thickness and height of the bread. I hope this helps, and that you love the next loaf even more!
Thank you so much for your help. I can’t wait to try it with your suggestions.
Oh you’re so welcome, we hope you love it! 😀
I made this bread today with a few tweaks. I added a T. of avocado oil, since another person commented it needed more fat. I also used Ener-G egg replacer for the egg whites. The bread turned out well! I rose like regular bread and sliced well. It tastes better than the store-bought gluten-free bread and it was so easy to make.
Thanks so much for your kind review and for sharing your experience! I’m thrilled it works with the Ener-G egg replacer, your comment will be so helpful to other readers as well, thanks again! 😀
Hi, first I want to say thank you for the brownie recipe. I tried it and it was absolutely perfectly delicious. Thank you for sharing. For this recipe, Can the gelatin be replaced with xantham gum?
Thank you so much, I’m delighted you’re enjoying the brownie recipe! 😀 This bread can be made without the gelatin, it will still set up, the texture will just be a touch different. I have not tested it with xanthan gum in it’s place, i would just use 1/4 teaspoon if you do try it with the gum. Hope this helps!
Thank you. Can’t wait to try it.
I don’t have a hand mixer so I used an immersion blender for the egg whites, which didn’t quite make them fluffy enough but the bread tastes great anyway! I think I would just add some salt because it’s just slightly sweet as is. But this is a great recipe! Thank you so much for coming up with a grain-free bread that really looks, tastes and has the texture of real bread!
Thanks so much for your kind and thoughtful review!! I’m really thrilled you enjoyed the bread and great idea to use the immersion blender for the egg whites!! 😀 I’ll put in an option for salt in the ingredients above.
You’re probably aware of this, but I think a bit of psyllium husk (well-ground) would add to the flexibility!
Thank you!
Thank you for your recommendation, I totally agree! Psyllium husk can absolutely add to the flexibility. We are sensitive to it and it’s not technically paleo, so we avoid it but it is a great recommendation for those that can tolerate it.
What will happen if I leave the gelatin out of this recipe.
It will still work without the gelatin, it won’t have exactly the same texture but it will still be good. Hope this helps! 🙂
I haven\’t tried an abundant amount of Paleo breads but so far, this one is the best! I love how it doesn\’t use an insane amount of eggs and doesn\’t have a strong or bitter flavor. Also, the texture is much more pleasant than other breads. I\’ll admit that the egg whites and gelatin had me curious and excited to try it. My expectations were pretty high and were pleasantly met. The only issue… I baked for 60 mins and after it cooled I cut into it and it still wasn\’t completely baked (mostly spongy and wet, but not raw). How do you test for done-ness?
You’re so kind thank you, I’m delighted you’re enjoying the bread! 😀 You can secure the foil tightly and the bread will cook a little more quickly throughout due to the steaming effect, it should feel firm when done. I do find that grain-free breads can be a little finicky as far as their cooking time- the doneness is revealed more by feel than a toothpick test due to the fact that it still sets up a bit as it cools. While we try to give the most universal time possible, some ovens take 5-10 minutes longer to fully cook the bread, I find this to be the case when I bake this bread away from home. I really hope this helps, thank you again for your kind comment!
Yeah bread!!!! I can\’t wait to make a sandwich tomorrow with this bread.
Just wanted to let you know that this still worked even with a little less tapioca starch (I ran out). I did add the tablespoon of avocado oil too.
Keep up your great recipes!!!
You are so kind Marion, thank you!! I’m delighted to hear the bread came out well with less tapioca. I hope you enjoy your sandwiches! 😀
Can this recipe be used in with a bread maker machine?
Hello and thank you for your comment. I’m sorry, but unfortunately this recipe cannot be made using a bread maker.