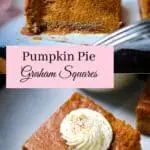
Keto Pumpkin Pie Graham Squares.
Fill your kitchen with the beautiful spiced aroma of these Keto Pumpkin Pie Graham Squares!

Oh man do I love pumpkin. My great grandmother made the BEST pumpkin pie. The kind with the impossibly delicious crust that can’t be duplicated. She would make a variety of pies for our Thanksgiving get togethers in a tiny town called Rescue, Virginia. Apple and sweet potato pie too–and I was dubious at that young age that a sweet potato pie could be good– but I was, of course, proved entirely wrong. So I think for me, as for many of you too, the taste of pumpkin pie is sweet in both flavor and memory.

Tell Me About The Pie!
This is our Keto Spin on that dessert– made into easy, scrumptious squares with graham cookie crust. The cookie dough is simply pressed into your parchment lined 8×8 baking dish followed by the pumpkin pie batter–it will already smell heavenly at this point, thanks to the mingling of ground cloves, cinnamon, vanilla extract and pureed pumpkin– but wait until this baby gets baking. Call me corny, but I think ovens must be pleased to exhale the incredible Autumnal pumpkin pie fragrance into the kitchen air.

Dairy-Free Option
If you are on the Keto diet and have a dairy allergy, this can easily be made with full fat coconut milk. The hint of coconut flavor that it brings is surprisingly wonderful–it’s a great option even if you don’t need to make this dairy-free. Either way, these squares are smooth, dreamy and delicious with every single bite.
If you love this recipe, we think you’ll also love our Keto Pumpkin Cheesecake Bars

Happy Baking!
Print
Keto Pumpkin Pie Graham Squares.
- Total Time: 1 hr 20 min
- Yield: 12-14 small squares 1x
- Diet: Gluten Free
Description
Each small square has 3.4 net carbs
*Swerve has zero net carbs
Ingredients
Graham Cookie Dough Crust
- 1.5 cups almond flour (Bob’s Red Mill)
- 1/4 cup coconut flour
- 1/4 cup Granular Swerve Sugar Replacement
- 2.5 teaspoons ground cinnamon
- 1 teaspoon gelatin
- 5 tablespoons salted butter, chilled and cubed (Earth Balance for Dairy-Free)
- 3 tablespoons cream or half and half (coconut milk for Dairy-Free)
- 2 teaspoons vanilla extract
Pumpkin Pie Filling
- 1 can pumpkin (15 oz) we use Libby’s 100% Pure (it’s well drained, makes for better filling)
- 2 eggs
- 3/4 cup + 1 tablespoon cream or half and half (coconut milk for Dairy-Free)
- 1 teaspoon vanilla extract
- 2/3 cup Granular Swerve
- 1 tablespoon of pumpkin pie spice
- 2.5 teaspoons gelatin (we used Knox)
Instructions
- Preheat your oven to 350 degrees.
- Line an 8×8 baking dish with parchment paper.
- Start with your Graham Cookie Crust: In a large bowl, whisk together almond flour, coconut flour, Swerve, cinnamon and gelatin. Cut butter into flour with a pastry cutter. Add cream and vanilla extract. Work the wet ingredients into your flour/butter mixture by hand until dough forms. It will feel dry at first, but keep at it until it comes together. Form dough into a ball.
- Press your graham cookie dough into your lined 8×8 baking dish so the bottom is covered evenly, set aside.
- Now for the filling: In another large bowl, add your canned pumpkin, cream, eggs and vanilla. Blend with a hand mixer just briefly until smooth. Add your Swerve, pumpkin pie spice + sprinkle gelatin over top and blend again until everything is incorporated evenly.
- Pour pumpkin batter over the pressed graham crust and place the pan into your preheated oven. Bake at 350 degrees uncovered for exactly 1 hour. Make sure to set a timer.
- This pie will be soft set at 60 minutes. The gelatin will firm it to perfection during the cooling process.
- After baking, we let it cool on the countertop for 15 minutes, then we place it into the freezer for 3 hours for quick setup. But you can also just place it in the fridge overnight.
- After the pie is chilled and set, pull it up out of the pan by picking up the parchment on both sides–lift swiftly and place onto a cutting board. Cut into squares with a large knife and serve with Swerve sweetened whipped cream, sprinkled with cinnamon if desired. Store leftovers in an airtight container and refrigerate. Enjoy!
- Prep Time: 20 minutes
- Cook Time: 60 minutes
- Category: Low-Carb
- Method: Baking
- Cuisine: Pie


Oh my oh my I want to sink my teeth right into this!! Looks like pumpkin heaven. Excited to try this for fall!
Aww thank you so much, I hope you love them, I couldn’t wait for Fall! 😉
I just started a lowcarb diet with my daughter we was really impressed with how good these were! I didn’t have whip cream but plan on making some next time. Thank you for the recipe.
I am so happy to hear this!! Thank you for your kind review + I hope you and your daughter enjoy the pumpkin squares all through the holidays! 😀
Thanks for the recipe. Just a couple questions. What is the purpose of the gelatine in the crust? And, do you think its necessary to add gelatine to the filling? Could you just make a regular pumpkin pie filling (like libby’s), and use a zero-carb sugar replacement?
Thanks.
Hello, thanks for your comment! You can get away with not adding the gelatin to the crust–we find it adds better texture to starch-less crusts, but it’s not required. It is required in this filling as it makes it creamier and firms + sets just right–it makes a big difference. Not using condensed milk and utilizing change of sweetener changes the texture. We tested it several ways and when we added the gelatin, it came together beautifully.
Hope this helps and hope you enjoy the recipe! 😀